This writeup was originally created by Sim Racing Cockpit and has been reposted and edited with consent
This setup guide for iRacing is intended to help you get started on your journey to finding your pace. Our guide covers your gear: wheelbase and pedals, setup for the iRacing software and input configs, and naturally, the basics of car setup, links to useful guides, and more, Enjoy!

TABLE OF CONTENTS
- Assumptions
- Your iRacing Settings
- Setting up Brakes, Steering, and more
- Your iRacing car setup
- Tips for a better iRacing experience
Assumptions
This guide was written with the intent to assist a user that is new to sim racing and may not be the most computer literate. This guide also assumes your sim rig is fully set up. Windows properly updated, drivers installed, and your pedals and wheel are ready to go.
If you are experiencing technical issues please contact support.
Your iRacing Settings
Now we’ll open iRacing and set up the graphics and controller properties. Firstly, make sure your installation is up to date. If it isn’t, there’ll be a message as you won’t be able to enter a race or go testing.
If updates are required, optional updates are for cars that you do not own, but may need when joining a session that features non-owned cars. It is okay to skip these updates for now, as you will be prompted to download any that are needed when joining a session.

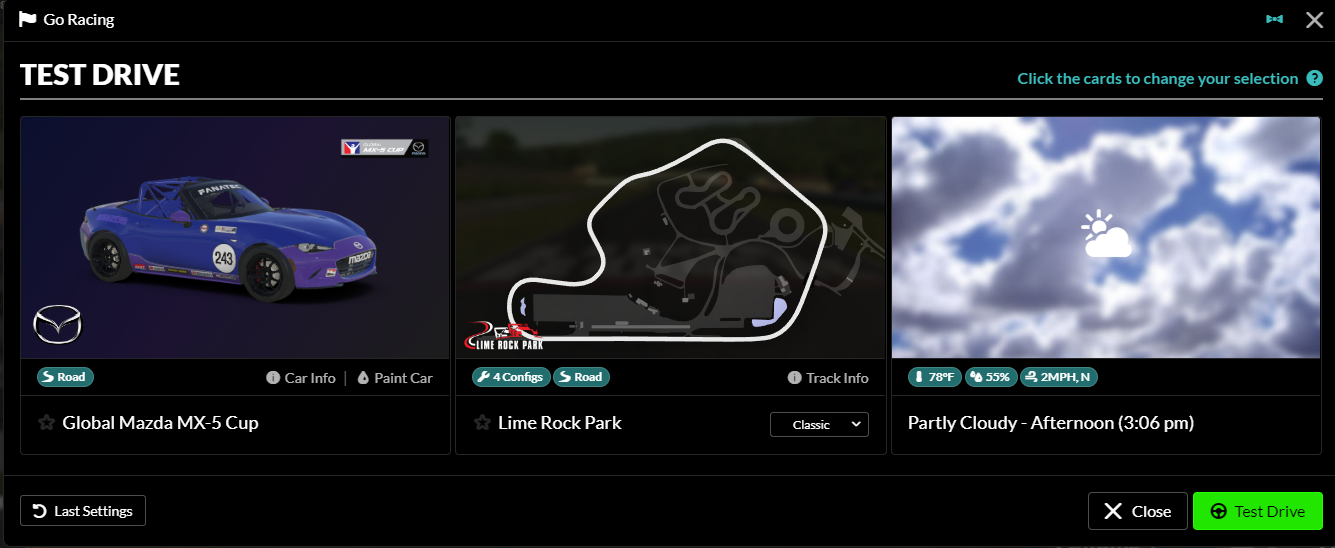
You should now be ready to open a session in iRacing, where we’ll tackle the final items on the list. Wheel and pedal setup, the shifter and the graphics settings. Now let's go for a Test Drive before your first race! Select the Test Drive button at the top of the UI, choose a car and track, then click the green Test Drive button to launch the session.
The first time you launch the iRacing Simulator, or launch on a new display mode, you will be asked to configure the initial graphics settings. We’ll be using the Auto-Configure tool, then adapting these settings, but it is best to let the configurator determine the baseline. It pre-configures things like screen resolution and memory limits. That’s not to say you can’t change them during configuration, it just gives you a useful starting point to get things perfect. Select the display you would like to use, press Auto Configure, and follow the steps in the wizard.


Setting up Brakes, Steering, and more
After the iRacing Simulator launches, select Settings at the top of the UI:

Now, we’re going to do the input calibration procedure. Simply follow the steps in the wizard until you are finished.
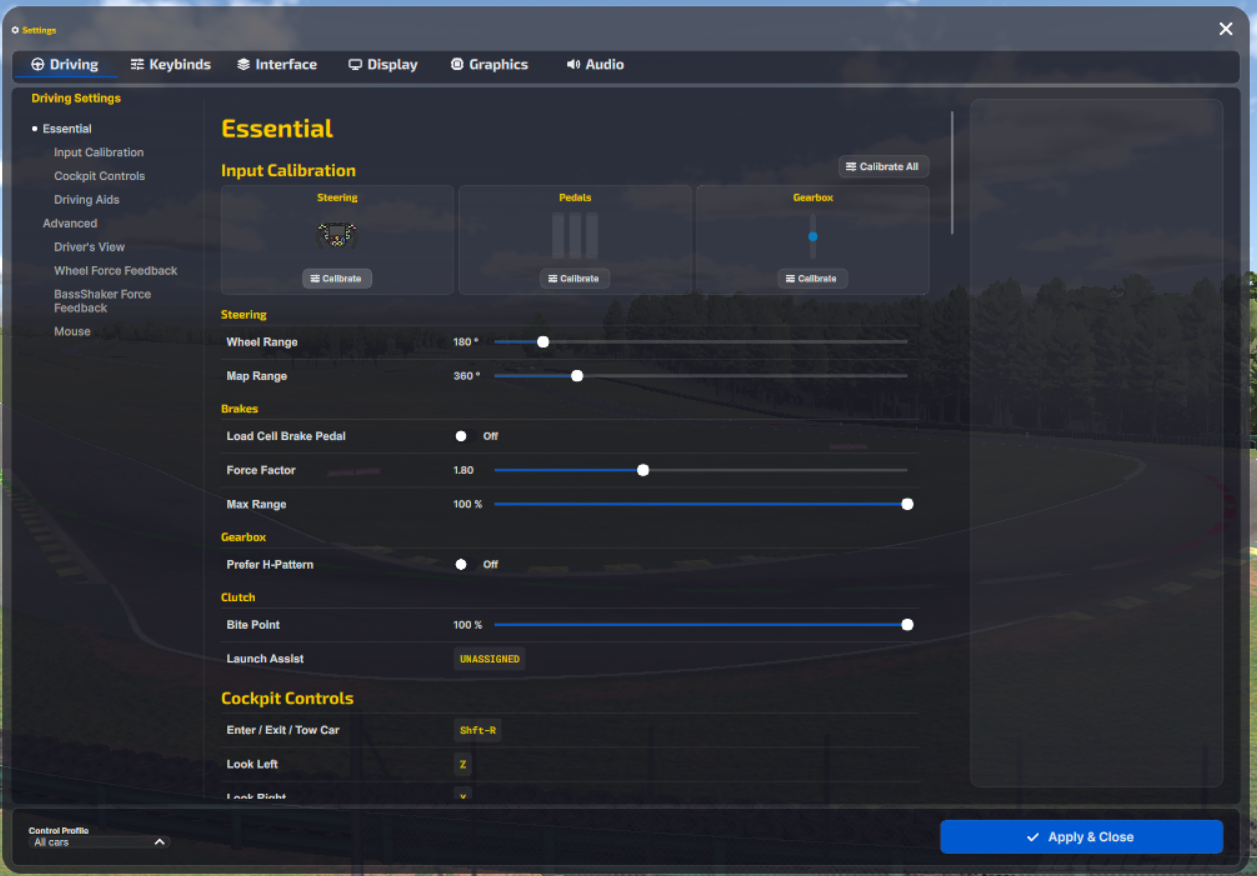
If you are using Load Cell pedals, set the Brake "Force factor" to 0.
"Strength" is a personal preference, although generally stronger direct drive wheels will prefer lower single-digit numbers, while entry level wheels will prefer Strength values in the teens. We probably don't need to touch it just yet, but most users will want to change this from the default value at some point.
If you are using a direct drive wheel, set "Wheel force" to the manufacturer's listed specifications and enable "Use linear mode"
If you’ve got the steering configuration right, your inputs should precisely match the little graphic of a steering wheel when you return to the main options screen. If the wheel in sim does not appear synced with your physical wheel when making tighter turns, you may need to adjust your wheel range to fine-tune the calibration.
For more information on controller setup, please refer to Controller Setup and Calibration.
Now, head to the “Display” and "Graphics" tabs and we’ll set up everything we need to make your racetrack look pretty:
For the most part, the automatic configuration sets resolution and so on. Sometimes it does not get the memory limits correct, so adjust them accordingly if they are significantly lower than your system's capabilities. It's always good to leave a few % of leeway for background applications if needed.
Most users should aim for performance over detail, but there are nice ways to reduce the load on your GPU while retaining an awful lot of detail at a high frame rate.
With the latest generation of Nvidia and AMD GPUs, you most mid range and higher end cards can get away with maximum settings all around. If you’re performance limited in some way, try these settings to help your framerate:
- In "Display" tab
- Enable SPS under VR Mode if you are using VR
- Enable AMD FSR under Resolution Scaling (This can be done with any brand of GPU and is not AMD specific)
- Enable SPS under VR Mode if you are using VR
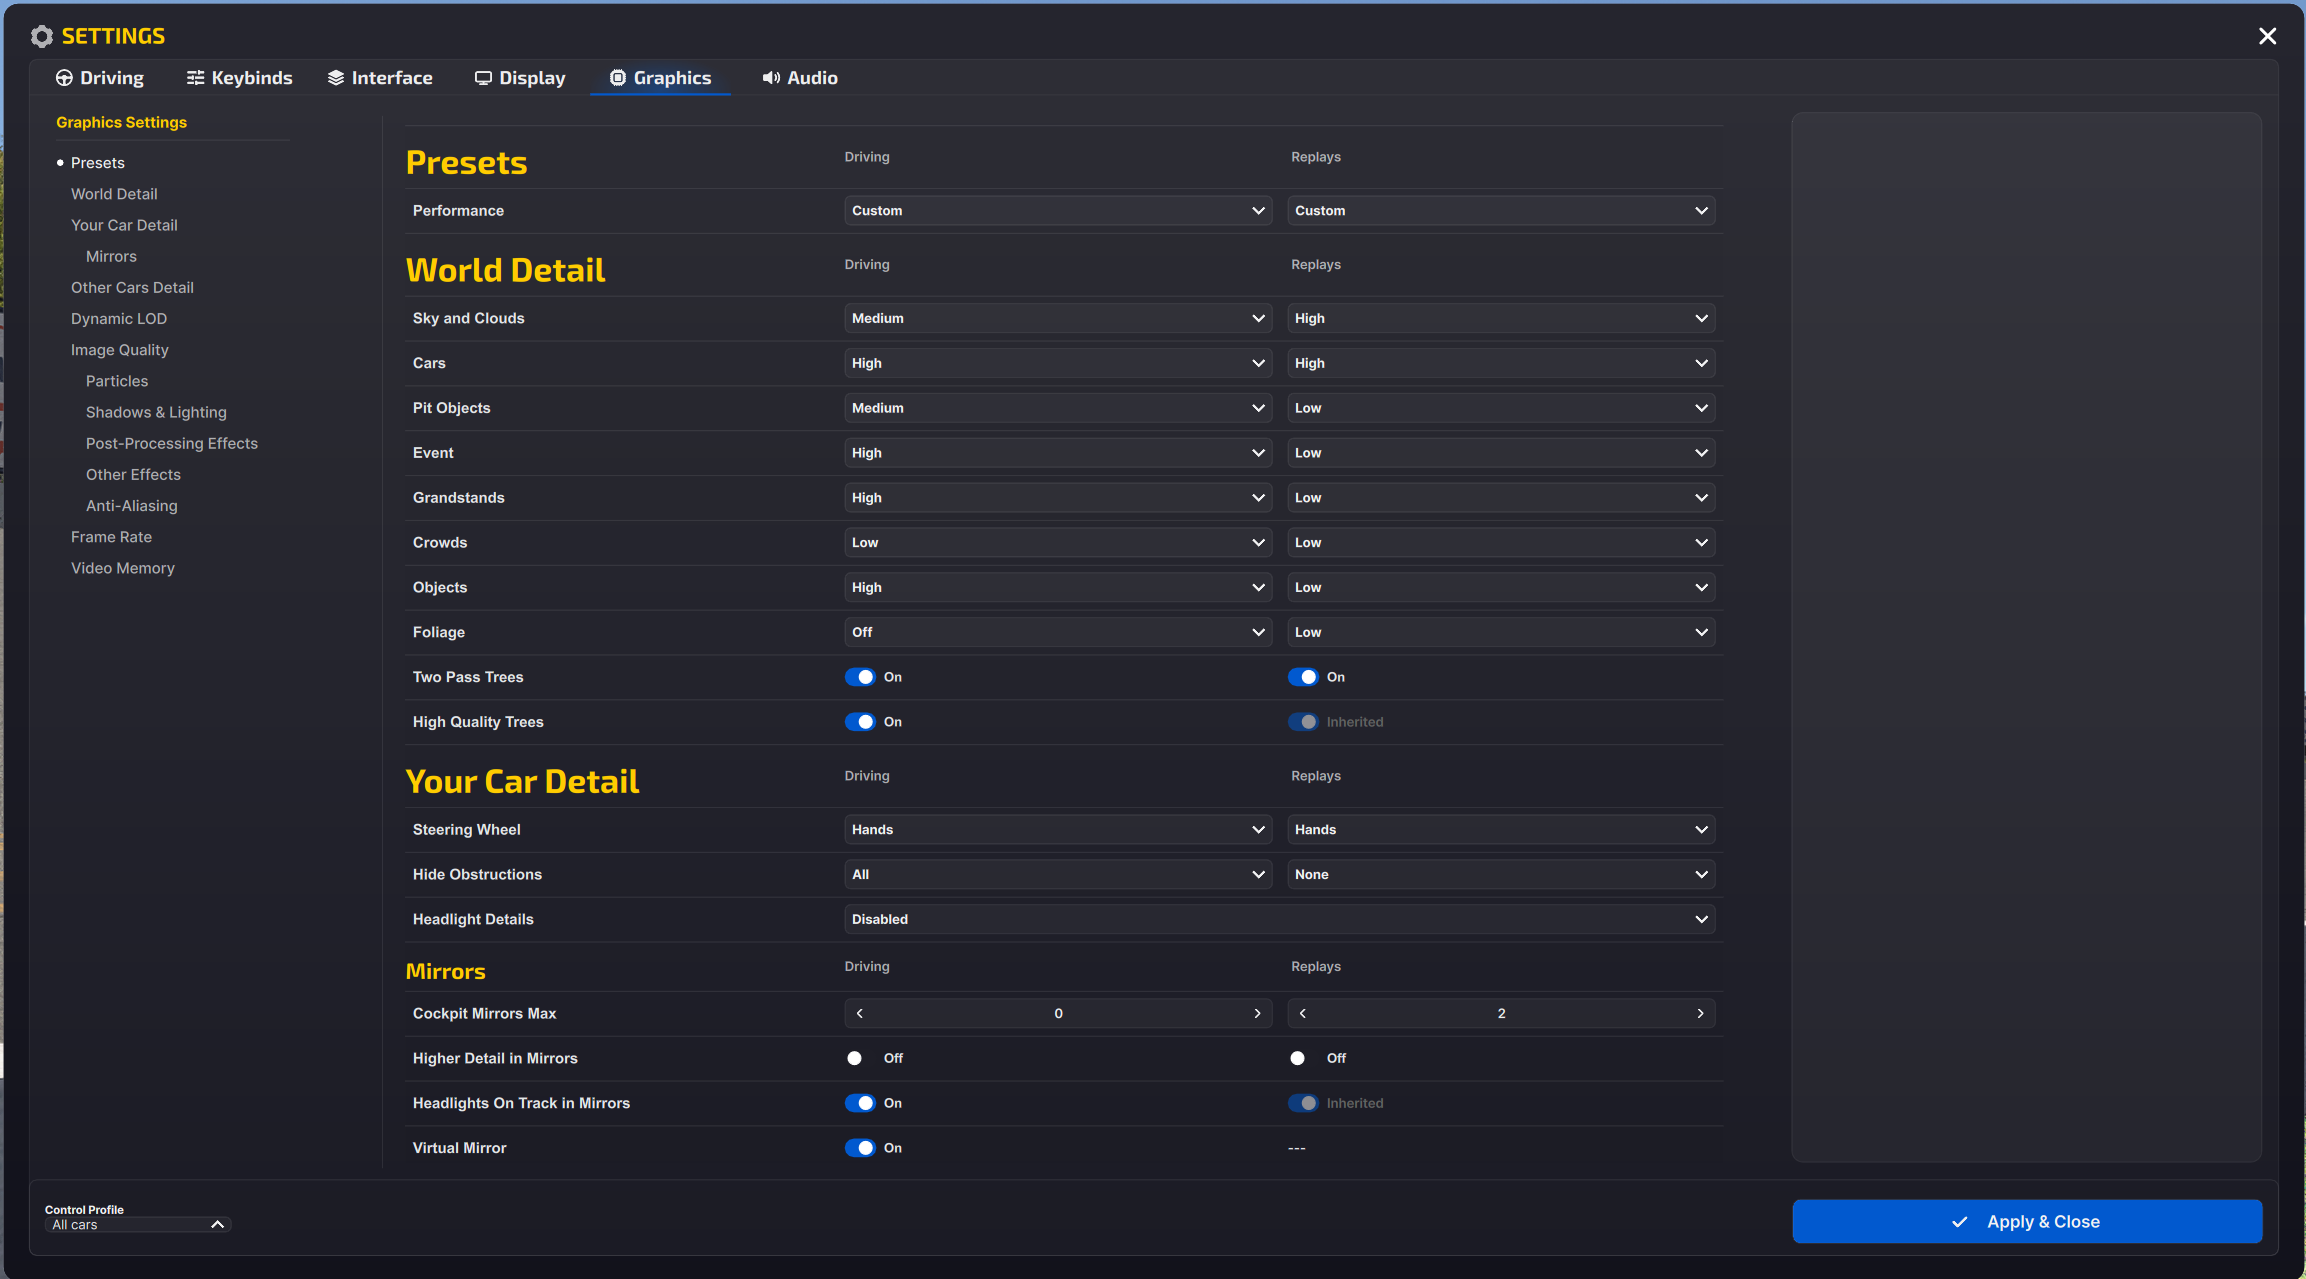
- In "Graphics" tab
- Set performance to “max quality” (Custom)
- Reduce detail on pit objects to medium
- Event: high detail
- Grandstands: off
- Crowds: off
- Objects: high detail
- Particles: high detail
- Reduce Max Cars to Draw 20 (12 cars)
- Adjust the Dynamic LOD FPS to your targeted framerate (between 70 and 150 depending on hardware)
- Limit your frame rate
- Disable Two Pass Trees, High Quality Trees, and SpeedTree Self Shadowing
In essence, you’re looking for the frame rendering to feel smooth, and not jerky in any way. If you are experiencing stuttering with high frame rates, then reducing the max frame rate may help. If you’ve got a high-end GPU and you’re still experiencing FPS stutter, it may be that your GPU is getting too hot. Try installing GPU-Z and have a look at the VRAM and GPU temps while the game is running.
Some machines struggle because they’re running very power-hungry background apps. For example, the ASUS Aura application makes outrageous demands on your PC. If your PC isn't giving you the performance it should be, it's always a good idea to check the task manager to see if there are any background applications causing issues.
Once you’ve got your graphics settings working for you, you should be fully set up and ready to go in iRacing. Go out and do some laps by selecting Done to exit the Options menu and selecting TEST. It may take a few tries to complete a lap, but don't be discouraged, we all have to start somewhere!

Your iRacing car setup
As soon as you’ve found your feet with iRacing and your wheelbase, software, and technical setup is done, you’ll want to start thinking about your vehicle setup. The setup of a car (ride height, spring rate, damper settings, aero settings, tire pressure, and so on) will determine how easy the car is to drive around a particular circuit, and how fast it will be!
Get to know the car and note where it is limiting your pace
I’m assuming that you’re reading this because you’re considering entering non-fixed setup races. Fixed setup races are really popular because the setup is fixed! No changes are possible, save for a few driver preference adjustments, so it’s much more of a pure driver competition. But in real life just as much of the competition is between the mechanics, making sure that your setup is the fastest set-up on the grid.
Outside of the fixed setup ecosystem where you can affect a lot of changes that fundamentally affect the way your car will handle:

Get used to the car before you make setup changes
When you’re totally new to a car, it pays to spend a good amount of time driving it before you make setup changes.
Once you’re comfortable and you feel you’re driving “on the pace” you’ll start to notice limitations. Does it take too much steering input to enter a corner (entry understeer) or worse, does it feel like you’re still steering the car in the corner exit and can’t get on the throttle because the car will go off the track? (exit understeer). These are behaviours that are difficult to ignore and, as they can ultimately affect how soon you’re able to get on the throttle and how late you can brake, they are going to limit your lap time.
My tip is to make a note of what the car is doing in the entry, mid and exit phases of the corner. Record whether the car understeers, oversteers, both (!) and where on the track map these characteristics are manifesting. This is the first part of determining what setup changes to make to the car: being able to record what it’s doing, correctly. And proper notetaking is surprisingly hard to get right at first.
Is the car understeering, or oversteering at the entry, mid or exit phase of the corner? Always write it down, watch the replays and in particular, focus on what you’re doing with the steering wheel.
Wait, what is understeer / oversteer?
When I was racing a Radical SR1 it was the most oversteering car, ever – it actually took a long time to sort it out because at the time I didn’t know how best to describe issues with the car.
The lesson: learn how to communicate what the car is doing! I made a short video comparing two setups, the first made the car oversteer, the 2nd balanced the car nicely and made it faster.
A demonstration of a Radical SR1 with two different setups:
By watching the steering wheel you can see how the car is behaving.
The first setup is quite rear-limited and therefore oversteers in the entry, mid and exit phases of the corner.
The second session shows a more balanced car with more grip at the rear.
The most important part of changing car setup is to just know one simple rule: only make one change at a time! That way, you know if your change has dealt with the problem, or made it worse.
Useful setup guides
There are lots of ways to improve your understanding of car setup. Here are some links you might want to take a look at:
- iRacing Car Setup Guide (pdf)
- Skippy tuning guide (pdf)
- The “ULTIMATE” racing car chassis setup guide (link)
- GTR Set-up Cheat Sheet (image)
- Understeer / Oversteer Quick Set-up guide (image)
- F1 Setup Solutions (image)
- Paradigm Shift Racing Flowchart Car-Setup (link)
- Live for speed basic setup guide (link)
Tips for a better iRacing experience
Now everything is running and you’ve got a feel for your new rig, we’re going to cover six important things which will definitely improve your iRacing experience and consequently, your driving!
Getting FOV (Field Of View) correct
I’d class FOV as a game-changer. It’s such an important thing to get right and having the correct FOV will enhance your racing. By making sure that you’ve got the correct field of view (FOV) settings configured, your brain should be able to help, not hinder, the visual interpretation of the racing environment you’re in (yes, really – check out the full guide here).
Even if you think you’ve got a good view in front of you, it might not actually be correct. And by “correct”, we mean the right field of view settings. To make sure you’ve got FOV configured perfectly, head to iRacing options.

You’ll see on the left-hand side of the options screen in the “Drivers View” section at the top (pictured above), firstly make sure the correct resolution for your monitor(s) are checked. You can do this manually but I’d advise using iRacing’s graphics setup wizard, as that will run a quick configuration script to match your hardware to the recommended settings.
Once that’s done, go to the "Display" tab and find the "Monitor" section and the "Field of View Calculator". Start by measuring your monitor width and bezel width, following the instructions in the tooltips for those settings.
Then, sit in your normal driving position and measure from your eyes to the centre point of the screen, and enter that distance into the “Viewing distance” field.
This will calculate the correct field of view. If the outcome is drastically different to what you’ve become used to, do a good few laps and you’ll find, very quickly that you get used to the changes. What you’re seeing is fundamentally the rendering mimicking what it’s like to see out of a real car.
As this is a “true representation” of what you might see in a real car, it’s important to make sure that you assign buttons on your steering wheel for look left and right so you can look into your mirrors or to the left and right of the car (just like you do when you’re actually racing a real life racing car!).
Get your Brake Force settings right
Next, we’re going to look at brakes. I’ve talked about threshold braking before, and generally the need to look out for a few gotchas like making sure you’ve disabled brake assist. But there’s an often missed setting called “brake force”.
Brake force factor, by default, is set to 1.80. It’s intended to help you make adjustments to control your brake response to pedal input so, for potentiometer pedals, the recommended setting is 1.6 to 2.0 and zero for “linear” pedals that use load cells such as Heusinkveld (and most of them, quite frankly!). But that gets missed, you upgrade to a better set of pedals and think no more of it other than calibration.
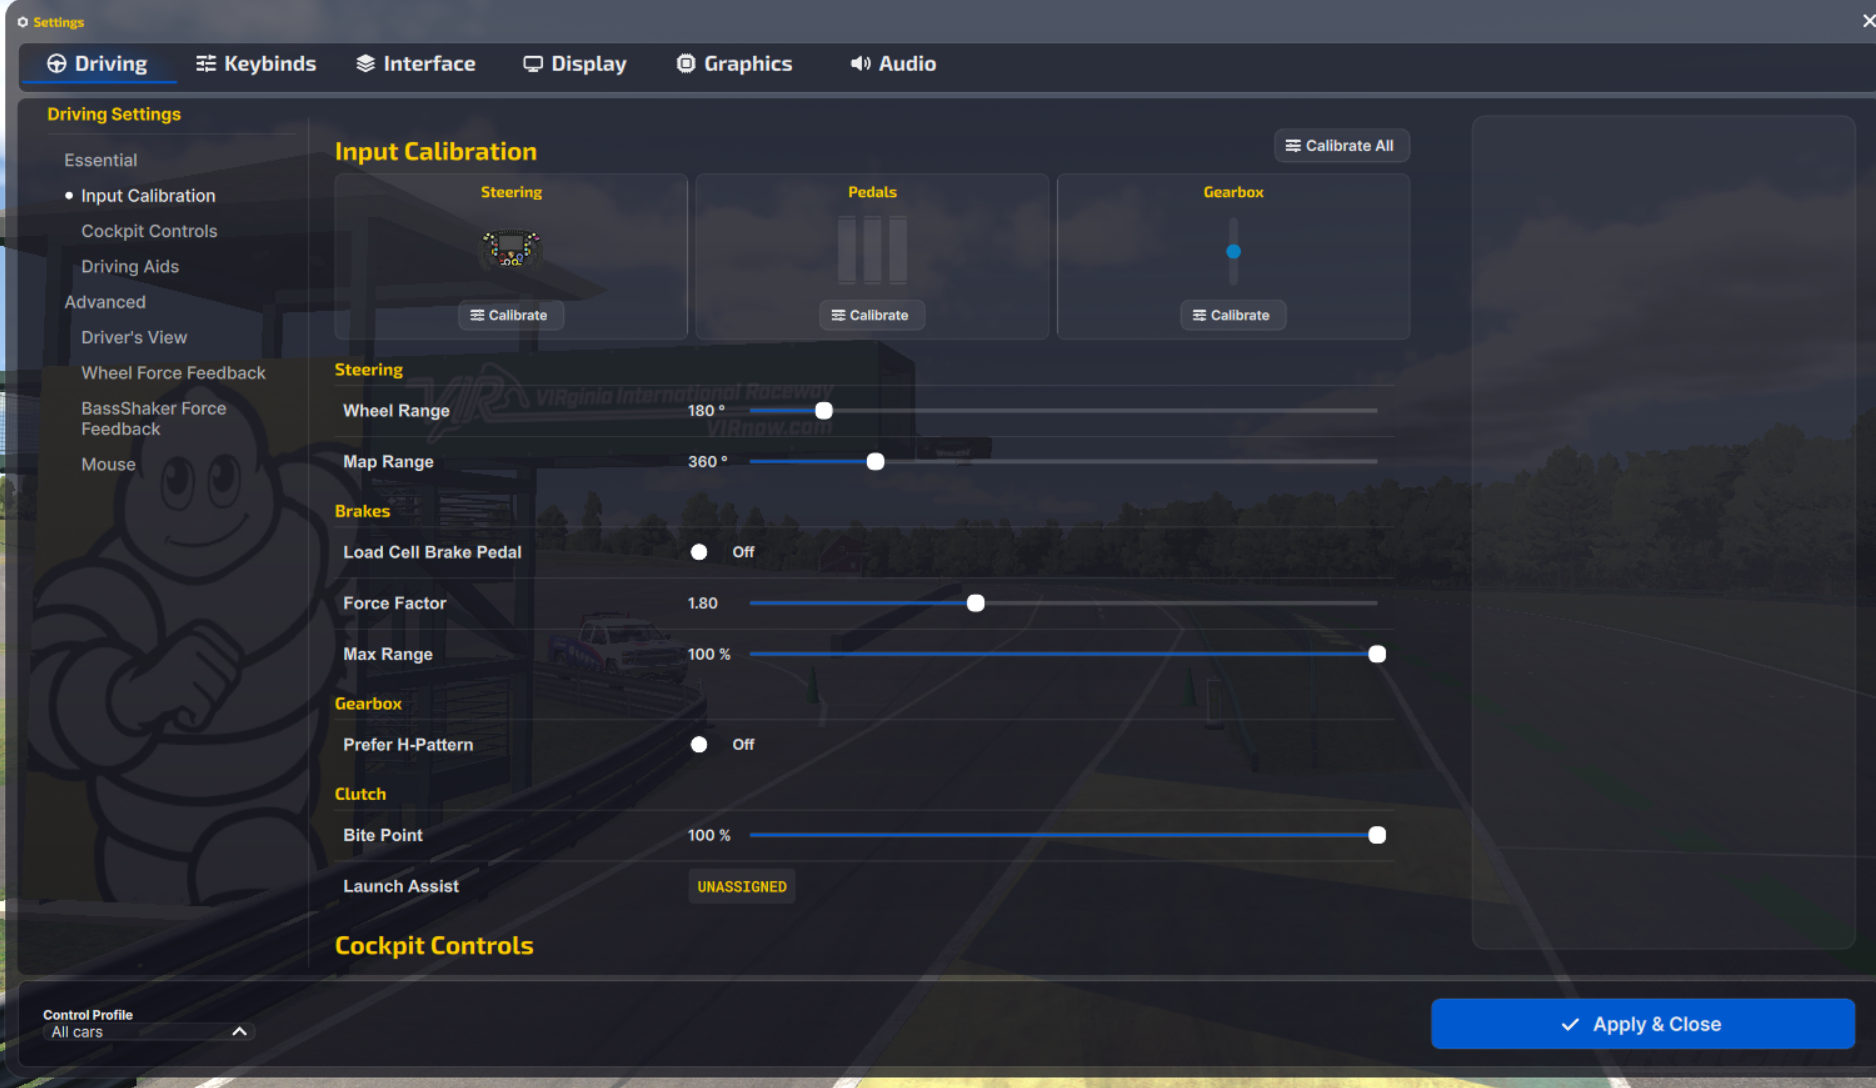
Fundamentally you can play around with this number to find the threshold where you’re not locking up the wheels but getting the absolute maximum brake force from the car. It’s a setting that is unique to each car, particularly the non-ABS stuff like the Porsche 911 RSR. So make sure you’ve selected “Use custom controls for this car”, because it’s an extremely car dependent setting.
Enable Fast Repair using iRacing’s app.ini
Fast repair does exactly what it says on the label, you pit, get an instant damage repair and you’re back in the race. By default, though, it’s turned off!
I’ve configured my Streamdeck with some iRacing macros for pitstop settings such as enable / disable tyre changes, enable fast repair and so on. You want to be able to control these settings because an unplanned pitstop will, by default, change your tires and re-fuel your car which can take ages.

But, you can enable or disable this stuff in the iRacing app.ini file, which is located in …\Documents\iRacing\app.ini.

There are lots of cool things you can customize in app.ini, like screen layout and other default settings. Check out this useful thread on Reddit for lots more where this tip came from.
Get Trading Paints
Want a more customized look and feel to your car’s livery, or perhaps an entirely custom paint job? Trading Paints is your friend. It’s extremely easy to install. Firstly, setup an account and install the application. Then, for any car you regularly drive, select a paint from the showroom:

Select the pain you like, and click “Race this paint”. So long as the application is running (just select it to run at startup), your car will look awesome:
Install Crew Chief
Since its inception, Crew Chief has come a long way. It’s a free application that handles a lot for you in-race, such as fueling and spotter warnings. There’s a huge community following and more settings than I can cover in this article. However, my top tip for Crew Chief is how to setup automatic fueling so that in an endurance race, you don’t have to attempt fuel calculations in your head (it’s not easy to work it out in your head and stay on the pace!).
Download the installer from the top link on the Crew Chief homepage. Install, open. Click all the update buttons and let it get up to date.

To set it to automatically calculate your fuelling, click “Properties”.
There are hundreds of settings on the properties page but fortunately, you can search by keyword for what you need:

I’ve highlighted a few things in red. The search for fuel highlights all fuel settings, the checkbox to enable automatic refueling and the additional fuel to add to finish the race. This last bit is important. Crew Chief is only software, it’ll calculate exactly the fuel you need. If you lose a tow or have an off, or even have to complete an extra lap for some reason you may not finish the race. I think a good safety margin is to get it to add 0.7 additional liters of fuel as a minimum.
When you’ve made the changes, click save changes and start crew chief. There’s a huge community and a lot of helpful tips for beginners here.
So now you’ve got all aspects of iRacing setup, it’s time to get racing! Good luck and we hope to see you in a race soon.